LoRa Rain Gauge
Regenmesser auf LoRaWAN Funktechnologie umgebaut
Während der Recherche zu einem Regenmengenmesser für meine IoT Wetterstation stieß ich auf den TFA Dostmann Regensender 30.3161, welcher in Bastlerkreisen sehr beliebt ist. Er wird als Ersatzteil für eine Wetterstation um etwa 20€ angeboten. Es gibt unterschiedliche Ansätze, das originale Funkprotokoll zu decodieren, die jedoch leider immer einen separaten Empfänger benötigen, was mir nicht gefällt.
Für besonders sparsame Sensorik im Internet der Dinge setzt sich zunehmend LoRaWAN durch. Das Übertragungsprotokoll überzeugt durch geringen Stromverbrauch (oft halten die Batterien über Jahre) und hohe Reichweiten (selbst im Stadtgebiet lässt sich 1km problemlos überbrücken).
Gateways in der Umgebung leiten alle empfangenen Datenpakete zu einem zentralen Server weiter, der diese dann decodiert und dem Eigentümer des Gerätes zur weiteren Verarbeitung zur Verfügung stellt. Ein solcher öffentlicher Netzwerkstack ist zum Beispiel The Things Network. Dafür habe ich bereits ein LoRaWAN Gateway. Warum also nicht das Innenleben des Regenmessers austauschen? Ein ideales Projekt für einen neuen LoRa Sensor war gefunden.
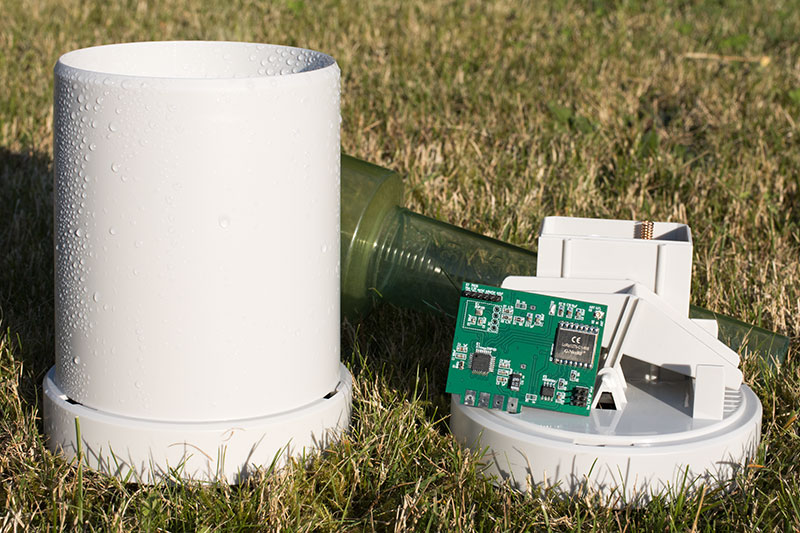
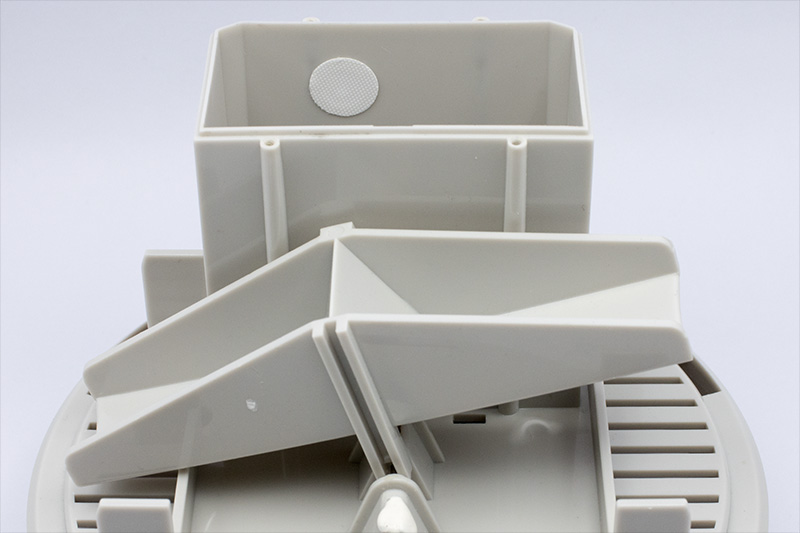
Das Funktionsprinzip des Regenmengenmessers ist simpel: Ein Trichter sammelt den Regen auf einer definierten Fläche, und leitet ihn auf eine Wippe mit zwei Kammern. Eine Niederschlagsmenge von 0,45mm sorgt dafür, dass das Wasser die Wippe umkippt. Nun läuft die andere Kammer voll, während die Flüssigkeit in der unten liegenden Kammer abläuft. In der Mitte der Wippe ist am äußeren Rand ein kleiner Permanentmagnet befestigt. Dieser löst einen Reedkontakt auf der Hauptplatine aus, wo die Impulse gezählt werden.
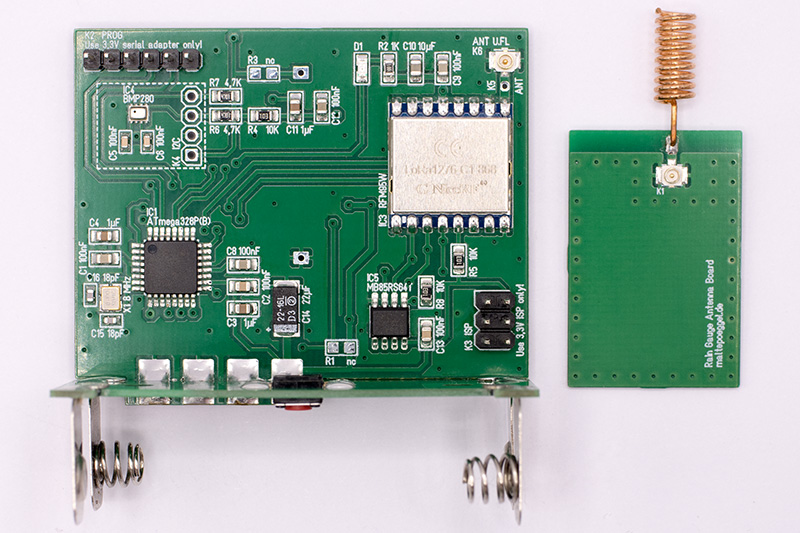
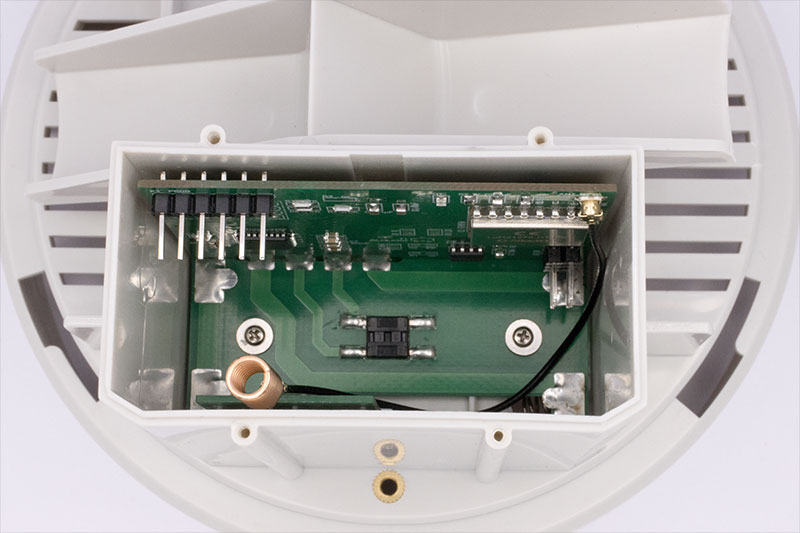
Im Inneren besteht der Sensor aus drei Platinen mit 1,0mm Stärke. Eine mit Batteriekontakten für 2x AA Batterien und einem Taster, eine Hauptplatine und eine Sendeplatine mit Antenne. Die mechanischen Dimensionen sind schnell aufgenommen, es wird alles neu gezeichnet. Die Batterieplatine bleibt ähnlich, die neue Sendeplatine dient nur noch als Halterung für die Antenne. Der neue Mikrocontroller und sämtliche Peripherie finden auf der Hauptplatine Platz. Wiederverwendet werden nur die Batteriekontakte, denn der alte Reedkontakt ist bistabil und die Antenne auf einen anderen Frequenzbereich ausgelegt.
Schaltungsbeschreibung
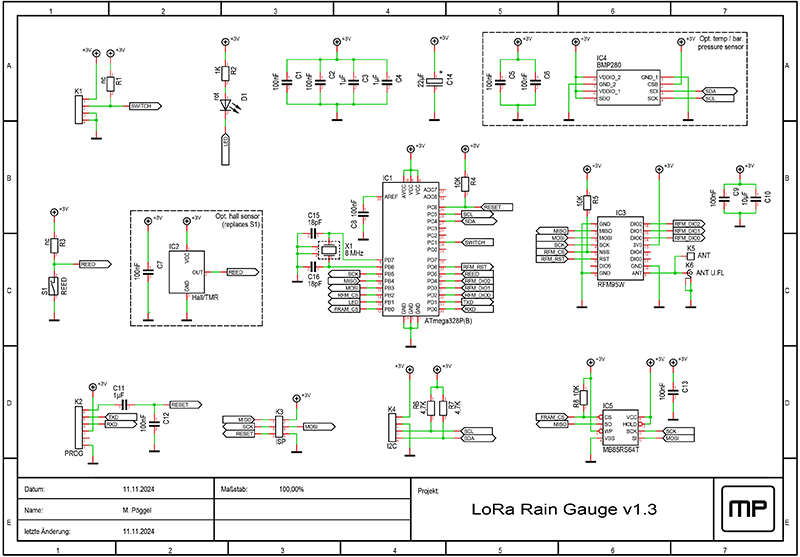
Das Herzstück der Schaltung bildet ein ATMega328P (IC1), der von einem Quarz (X1) mit 8MHz getaktet wird. Um den Impuls des Magneten zu erkennen, kann entweder der Reedkontakt (S1) oder der Hallsensor TMAG5231 bzw. der Tunnel Magnetoresistance Sensor LF21235TMR (IC2) verbaut werden. Prinzipbedingt erreicht der TMR Sensor höhere Abtastraten bei geringerer Stromaufnahme und ist somit bevorzugt zu verwenden. Das Funkmodul RFM95W (IC3) sorgt für LoRa Konnektivität. Die rote Leuchtdiode (D1) zeigt den Sendestatus an. Zur Erfassung von Temperatur und Luftdruck kann optional ein BMP280 (IC4), alternativ über I2C Stiftleiste (K4) bestückt werden. Der FRAM Speicherchip MB85RS64T (IC5) wird benutzt, um die LoRaWAN Aktivierungsdaten und den Zählerstand abzuspeichern. Dies geschieht alle drei Sendevorgänge, um die Zahl der Schreibzyklen zu reduzieren. Im Fall eines Batteriewechsels werden die gespeicherten Informationen wiederhergestellt. Der ISP Steckverbinder (K3) wird initial benutzt, um den Bootloader zu programmieren. Anschließend kann die serielle Schnittstelle auf dem Steckverbinder K2 zum Hochladen der Firmware genutzt werden. An beiden Anschlüssen sind ausschließlich 3,3V Logikpegel zulässig.
Bestückung
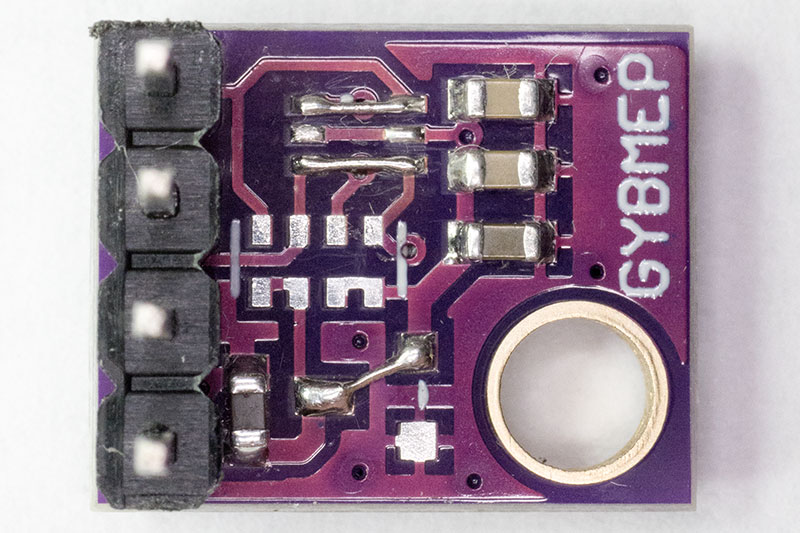
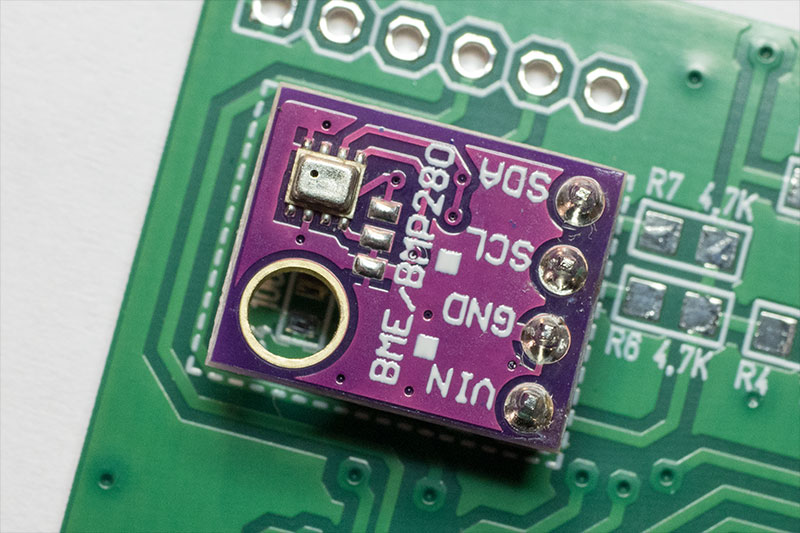
Widerstände und Kondensatoren sind bis auf wenige Ausnahmen (C5, C6, C15, C16) in der Bauteilgröße 0805 gehalten und mit etwas Übung händisch lötbar. Das Quarz kann einfach mit Heißluft auf gleichmäßig vorverzinnte Pads aufgelötet werden. Der 2,0x2,5mm große BMP280 hingegen ist deutlich schwieriger zu löten. Wer den Luftdrucksensor nicht mit Stencil, Lötpaste und Heißluft direkt auf die Platine auflöten möchte, kann jedoch die I2C Stiftleiste (K4) benutzen, um eine handelsübliche Modulplatine anzuschließen. Auf dieser müssen Spannungsregler und Level Shifter wie im Bild gezeigt, ausgelötet und gebrückt werden, um die Ruhestromaufnahme niedrig zu halten. Zusätzlich habe ich auch eine eigene Sensorplatine ohne Spannungsregler entworfen. Hier muss zwar der BMP280 ebenfalls selber gelötet werden, ein Austausch ist aber einfacher möglich als bei direktem Auflöten auf der Hauptplatine.
Einbau
Um eine Messung des Luftdrucks zu ermöglichen und zu verhindern, dass Feuchtigkeit in das Gehäuse gesaugt wird, wird neben der Antennenplatine ein 1mm Loch gebohrt und von innen mit einer selbstklebenden Druckausgleichsmembran wieder verschlossen. Hauptplatine und Batterieplatine werden ineinandergesteckt und zunächst an einer Lötstelle verbunden. Die beiden Platinen werden vorsichtig in das Gehäuse geschoben und die Ausrichtung geprüft. Dabei sollte die Hauptplatine möglichst parallel zur Gehäusewand liegen, damit Reedkontakt oder Hallsensor / TMR sauber ansprechen. Nach eventueller Korrektur der Ausrichtung durch Herausziehen der Platinen und Erhitzen der Lötstelle werden abschließend alle Anschlüsse verlötet. Dabei unbedingt behutsam vorgehen, um die Lötpads auf der Platine nicht mechanisch zu beschädigen. Hauptplatine und Antennenplatine werden mit einem 10cm langen U.FL Kabel verbunden. Nachdem der Bootloader auf den Mikrocontroller geflasht wurde, kann die Platine im Gehäuse verschraubt werden. Ein Update der Firmware ist auch noch im eingebauten Zustand möglich. Der dazu nötige serielle Steckverbinder liegt am oberen Platinenrand.
Firmware
Die Firmware nutzt die PlatformIO Buildumgebung sowie Arduino und die MCCI LMIC Bibliothek. Alle Abhängigkeiten werden automatisch aufgelöst. Zur Benutzung auf der Konsole wird PlatformIO Core heruntergeladen, alternativ kann als IDE VS Code mit PlatformIO als Plugin verwendet werden.
Nach dem Download der Firmware von Github wechseln wir auf der Konsole in das entsprechende Verzeichnis.
cd lora-raingauge
Im ersten Schritt muss einmalig der Bootloader in den ATMega328P gebrannt werden. Dazu ist ein AVR-ISP (z.B. USBasp) mit 6 Pin Stecker (K3) nötig, der auf 3,3V Pegel arbeitet. Vorsicht: Eine höhere Spannung führt zur Zerstörung des RFM95W. Der Programmiervorgang wird wie folgt durchgeführt:
Im Verzeichnis src wird nun die Datei config.h.example nach config.h kopiert und mit einem beliebigen Editor geöffnet. Hier werden die OTAA Aktivierungsdaten (siehe unten) entsprechend dem zu nutzenden LoRaWAN Stack (z.B. The Things Network oder Chirpstack) hinterlegt. Anschließend kann die Firmware compiliert und über den Arduino Bootloader via serieller Schnittstelle (K2) hochgeladen werden. Auch hier ist ausschließlich auf 3,3V Pegel zulässig. Der Vorgang wird mit folgendem Kommando ausgeführt:
Nach erfolgreichem Upload startet der Regenmesser und wechselt zunächst in den Deep Sleep Modus. Er wacht auf, sobald definierte Zeitspanne von 15 Minuten abgelaufen ist oder der Taster im Batteriefach gedrückt wird (einmal in der Minute möglich). Sollte keine Session bestehen, nimmt das Gerät zunächst eine OTAA Aktivierung am LoRaWAN Stack vor und überträgt dann die Messdaten. Eine leuchtende LED zeigt die Datenübertragung an. Schlägt die Aktivierung fehl, blinkt die LED für einige Sekunden. Danach geht der Mikrocontroller wieder in den Deep Sleep Modus. Nach dem Aufwachen startet die Datenübertragung (oder falls fehlgeschlagen die Aktivierung) erneut. Die Debug-Ausgabe auf der seriellen Schnittstelle kann mit folgendem Befehl betrachtet werden:
Der Sensor speichert seine Aktivierungsdaten und den Zählerstand der Regenmenge hin und wieder im FRAM, um diese nach einem Batteriewechsel von dort wiederherzustellen. Soll die OTAA Aktivierung erneut durchgeführt werden, so kann beim Einlegen der Batterien der Taster im Batteriefach für einige Sekunden festgehalten werden. Des Weiteren wird eine Prüfsumme der Konfigurationsdatei in die Firmware eincompiliert und im Header der FRAM Daten zum späteren Vergleich gespeichert. Ein Flashen der Firmware mit einer veränderten config.h führt somit ebenfalls zu einem Reset der Daten.
Konfiguration des Netzwerkstacks
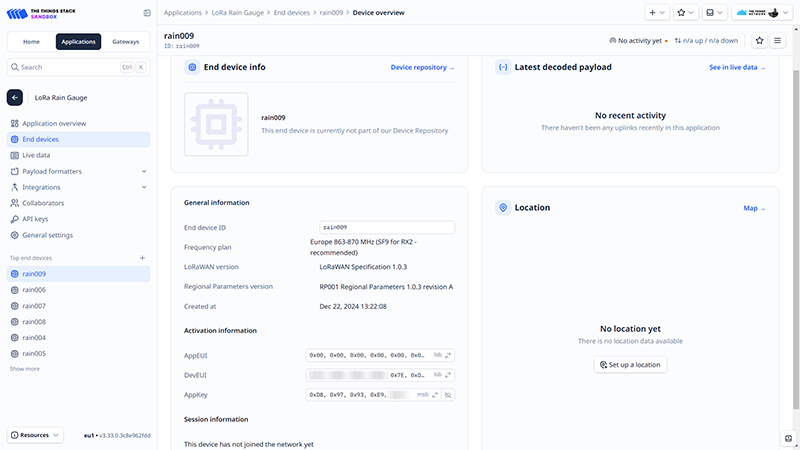
In der Oberfläche des LoRaWAN Stacks muss zunächst eine neue Applikation angelegt werden. Unterhalb dieser wird dann der Uplink Payload Decoder in Form von Java-Script hinzugefügt, welcher die eingehenden Binärdaten in das menschenlesbare JSON Datenformat umwandelt. Der passende Code für TTN und Chirpstack kann im Repository unter docs/payload-decoder.js gefunden werden. Die gesendete Paketgröße variiert, je nachdem ob ein BMP280 Temperatur- / Luftdrucksensor erkannt wurde oder nicht. Dies wird auch im Payload Decoder automatisch berücksichtigt.
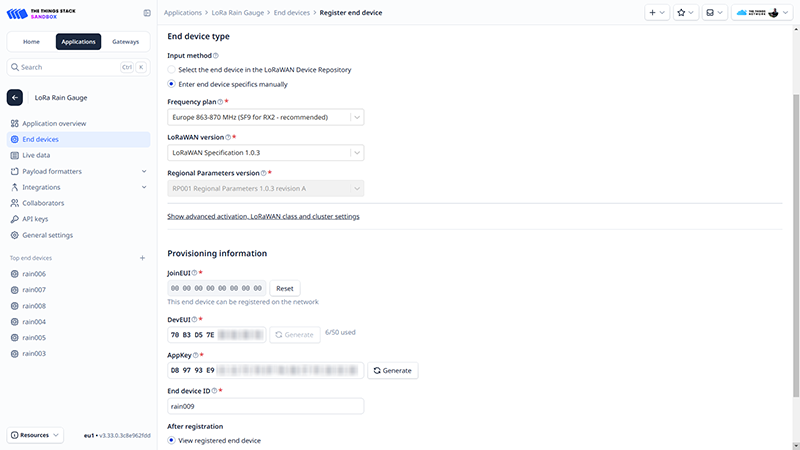
Unter der Applikation kann nun eine beliebige Anzahl passender Endgeräte (Nodes) registriert werden. Im Things Network wird dabei als Bandplan "Europe 863-870 MHz (SF9 for RX2 - recommended)" gewählt. SF12 wäre ebenfalls möglich, die Konfiguration wird als Bestandteil der Over-The-Air-Activation (OTAA) synchronisiert. Die LoRaWAN Version wird auf 1.0.3 eingestellt. Diese ist durch die LMIC Bibliothek vorgegeben.
Die AppEUI oder JoinEUI kann mit Nullen gefüllt werden, DevEUI sowie AppKey lassen sich in der Oberfläche des Stacks generieren. Diese Daten werden dann aus der Oberfläche in die oben erwähnte config.h eingetragen. Wichtig ist es dabei, die korrekte Byte Reihenfolge zu beachten. Erstere Werte sind in Little-Endian (LSB) Reihenfolge gehalten, während der AppKey die Big-Endian (MSB) Reihenfolge nutzt.
Nun kann mit dem Compilieren und Übertragen der Firmware fortgefahren werden. Aktivierung und übertragene Datenpakete lassen sich im Log des Netzwerkstacks verfolgen, ebenso lässt sich die decodierte Payload einsehen.
Es ist außerdem möglich, den Sendeintervall und den Regenzähler zur Laufzeit anzupassen, indem eine entsprechende Downlink-Nachricht gesendet wird. Hierbei kommt fPort 1 für den Intervall in Sekunden und fPort 2 für den Zählerwert zum Einsatz. Beide werden als vorzeichenlose 16-Bit-Ganzzahl (MSB zuerst) übertragen. Beispielsweise wäre für 15min (900sec) Intervall der Hexadezimalwert 0384 an fPort 1 zu schicken. Die Option zum Senden eines Downlink-Paketes findet sich im TTN unter "Messaging" bzw in Chirpstack unter "Queue".
Visualisierung der Daten
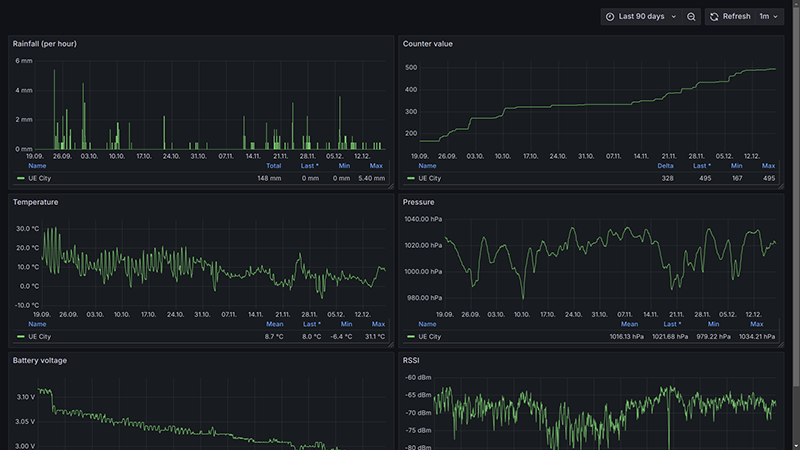
Um die Messdaten zu speichern und grafisch aufzubereiten, nutze ich einen Telegraf-InfluxDB-Grafana Stack. Hierzu habe ich eine Beispielkonfiguration mittels der Containervirtualisierung Docker vorbereitet, die innerhalb von wenigen Minuten startklar ist. Dabei holt Telegraf die decodierten JSON Daten über die MQTT Integration des Things Network ab, und schreibt sie in die InfluxDB Datenbank. Grafana wird bereits mit einem passenden Dashboard provisioniert. Nach dem Download des Repository von GitHub und dem Eintragen der MQTT Verbindungsdaten werden die Container per Docker Compose erstellt und Grafana ist via Webbrowser abrufbar. Die genauen Schritte sind in der zugehörigen Readme beschrieben.
Batterielebensdauer
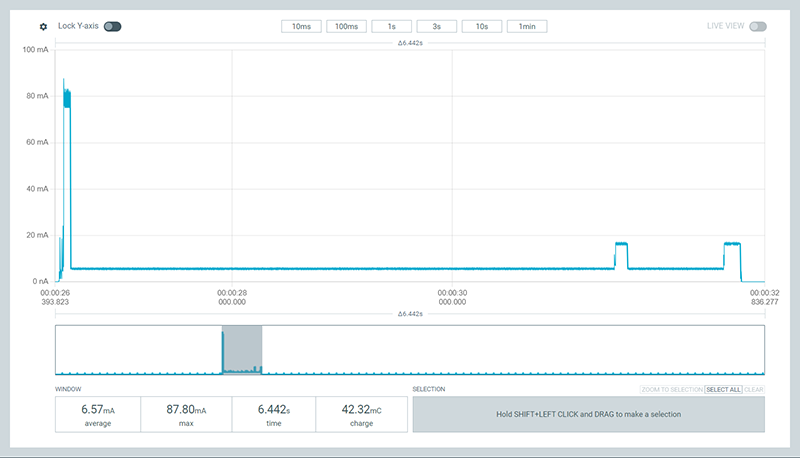
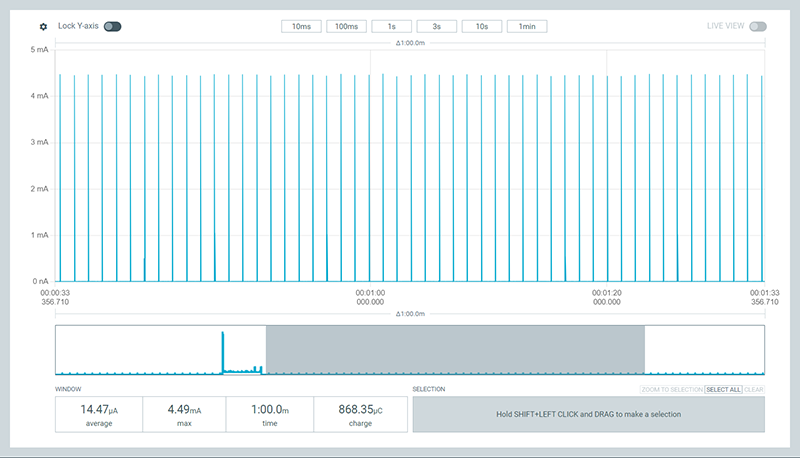
Um die Lebensdauer der Batterien zu ermitteln, wurde der Strombedarf mit dem Power Profiler Kit 2 gemessen. Die unten stehenden Screenshots zeigen die Stromaufnahme für Datenerfassung und Übertragung über einen Zeitraum von etwa 6s bei SF7 sowie den Deep Sleep über einen Zeitraum von einer Minute.
Die Software gibt die entnommene Ladung in Coulomb aus. Betrachten wir diese über einen Zeitraum von einer Stunde, so wird die Schaltung vier Messungen (je 42,3mC/6s - 169,2mC/24s) im Abstand von 15 Minuten durchführen und nahezu eine Stunde (je 868,3µC/min - 52,1mC/h) im Deep Sleep verbringen. Da die Dauer der Messung verschwindend gering ist, addieren wir zur Vereinfachung der Berechnung beide Werte und erhalten eine Ladung von 221,3mC/h. Dies entspricht 0,0615mAh/h. Bei einer Batteriekapazität von 2000mAh ergibt sich somit eine Laufzeit von 1355 Tagen beziehungsweise 3,7 Jahren.
Anmerkungen
Bei Verwendung des ATMega328P ist zu beachten, dass dieser laut Datenblatt nur bis 2,7V spezifiziert ist. Es kann jedoch stattdessen der neuere ATMega328PB verwendet werden, welcher bei 8MHz im gesamten Temperaturbereich bis etwa 2,1V herunter zuverlässig arbeiten soll. Entsprechende Entladekurven zeigen, dass sich die oben angenommene Kapazität von 2000mAh mit einer Alkali-Mangan-Batterie bei einem Entladestrom ≤100mA mit dieser Entladeschlussspannung realistisch erreichen lässt.
Für das Timing im Deep Sleep Modus kommt der prozessorinterne Watchdog zum Einsatz. Dieser verwendet leider einen RC Oszillator, welcher abhängig von Betriebsspannung und Umgebungstemperatur Abweichungen aufweist. Wenn nötig, kann eine Korrektur des Intervalls per Uplink Paket durchgeführt werden.
Zur Strommessung wurde das Power Profiler Kit 2 aus einem externen Linearnetzteil versorgt. In früheren Revisionen ließen sich dennoch Schwingungen beobachten, die durch den gepulsten Betrieb des Hallsensors entstanden. Zu diesem Phänomen finden sich verschiedene Berichte im TI Forum. In Platinenversion 1.2 wurde daher ein Tantalkondensator hinzugefügt, die Massefläche optimiert und das Layout auf vier Kupferlagen erweitert. Die zusätzlichen, innen liegenden Layer führen durchgängig 3V Betriebsspannung und Masse. Auffälligkeiten konnten damit keine mehr festgestellt werden.
In einigen Fällen führten Abweichungen des Keramikresonators zu fehlschlagenden Joins und Downlinks. Dies konnte softwareseitig durch Setzen größerer Toleranzen im LMIC Stack behoben werden. Dennoch wurde in Revision 1.3 auf ein Quarz gewechselt, um eine höhere Taktgenauigkeit zu erreichen.
Downloads
- Schaltplan (PDF)
- Stückliste (PDF)
- Layouts und Stückliste
- Layout der Hauptplatine im Gerber Format
- Layout der Batterieplatine im Gerber Format
- Layout der Antennenplatine im Gerber Format
- Layout der Sensorplatine im Gerber Format
- Firmware auf GitHub
- Docker Telegraf-InfluxDB-Grafana Stack auf GitHub
- Laubschutzgitter (Thingiverse)
- Halteplatte mit 90 Grad Winkel für Mauer oder Flachdach (Thingiverse)
Es sind noch einzelne Platinen und Bauteile aus der Entwicklung übrig. Bei Interesse einfach anschreiben.
Veröffentlichungen
- Hackaday: A LoRa Rain Gauge From The Ground Up
- AATiS Praxisheft 35: Regenmesser auf LoRaWAN Funktechnologie umgebaut
Weitere interessante Projekte
- LoRaWAN Regenmesser (icplan.de)
- rtl_433 - Decodierung des originalen Senders mittels SDR Stick (github.com)
- Regensender TFA 30.3161 decodieren (via Raspberry Pi Pico) (blog.heimetli.ch)
- Regenmesser für ioBroker (Quelle zur Berechnung der Regenmenge pro Impuls) (forum.iobroker.net)
Lizenz
Das Projekt darf für privaten Gebrauch frei verwendet und modifiziert werden, der Name des Autors muss jedoch erhalten bleiben (CC BY-NC-SA).

